South Australian Manufactured, Assembled and Supplied
ReGen Building Solutions supports the Industry Advocate’s SA Product Register initiative and we have a range of products that are Supplied, Assembled and Manufactured in South Australia. We believe in the importance of having a South Australian supply chain.
 |
 |
 |
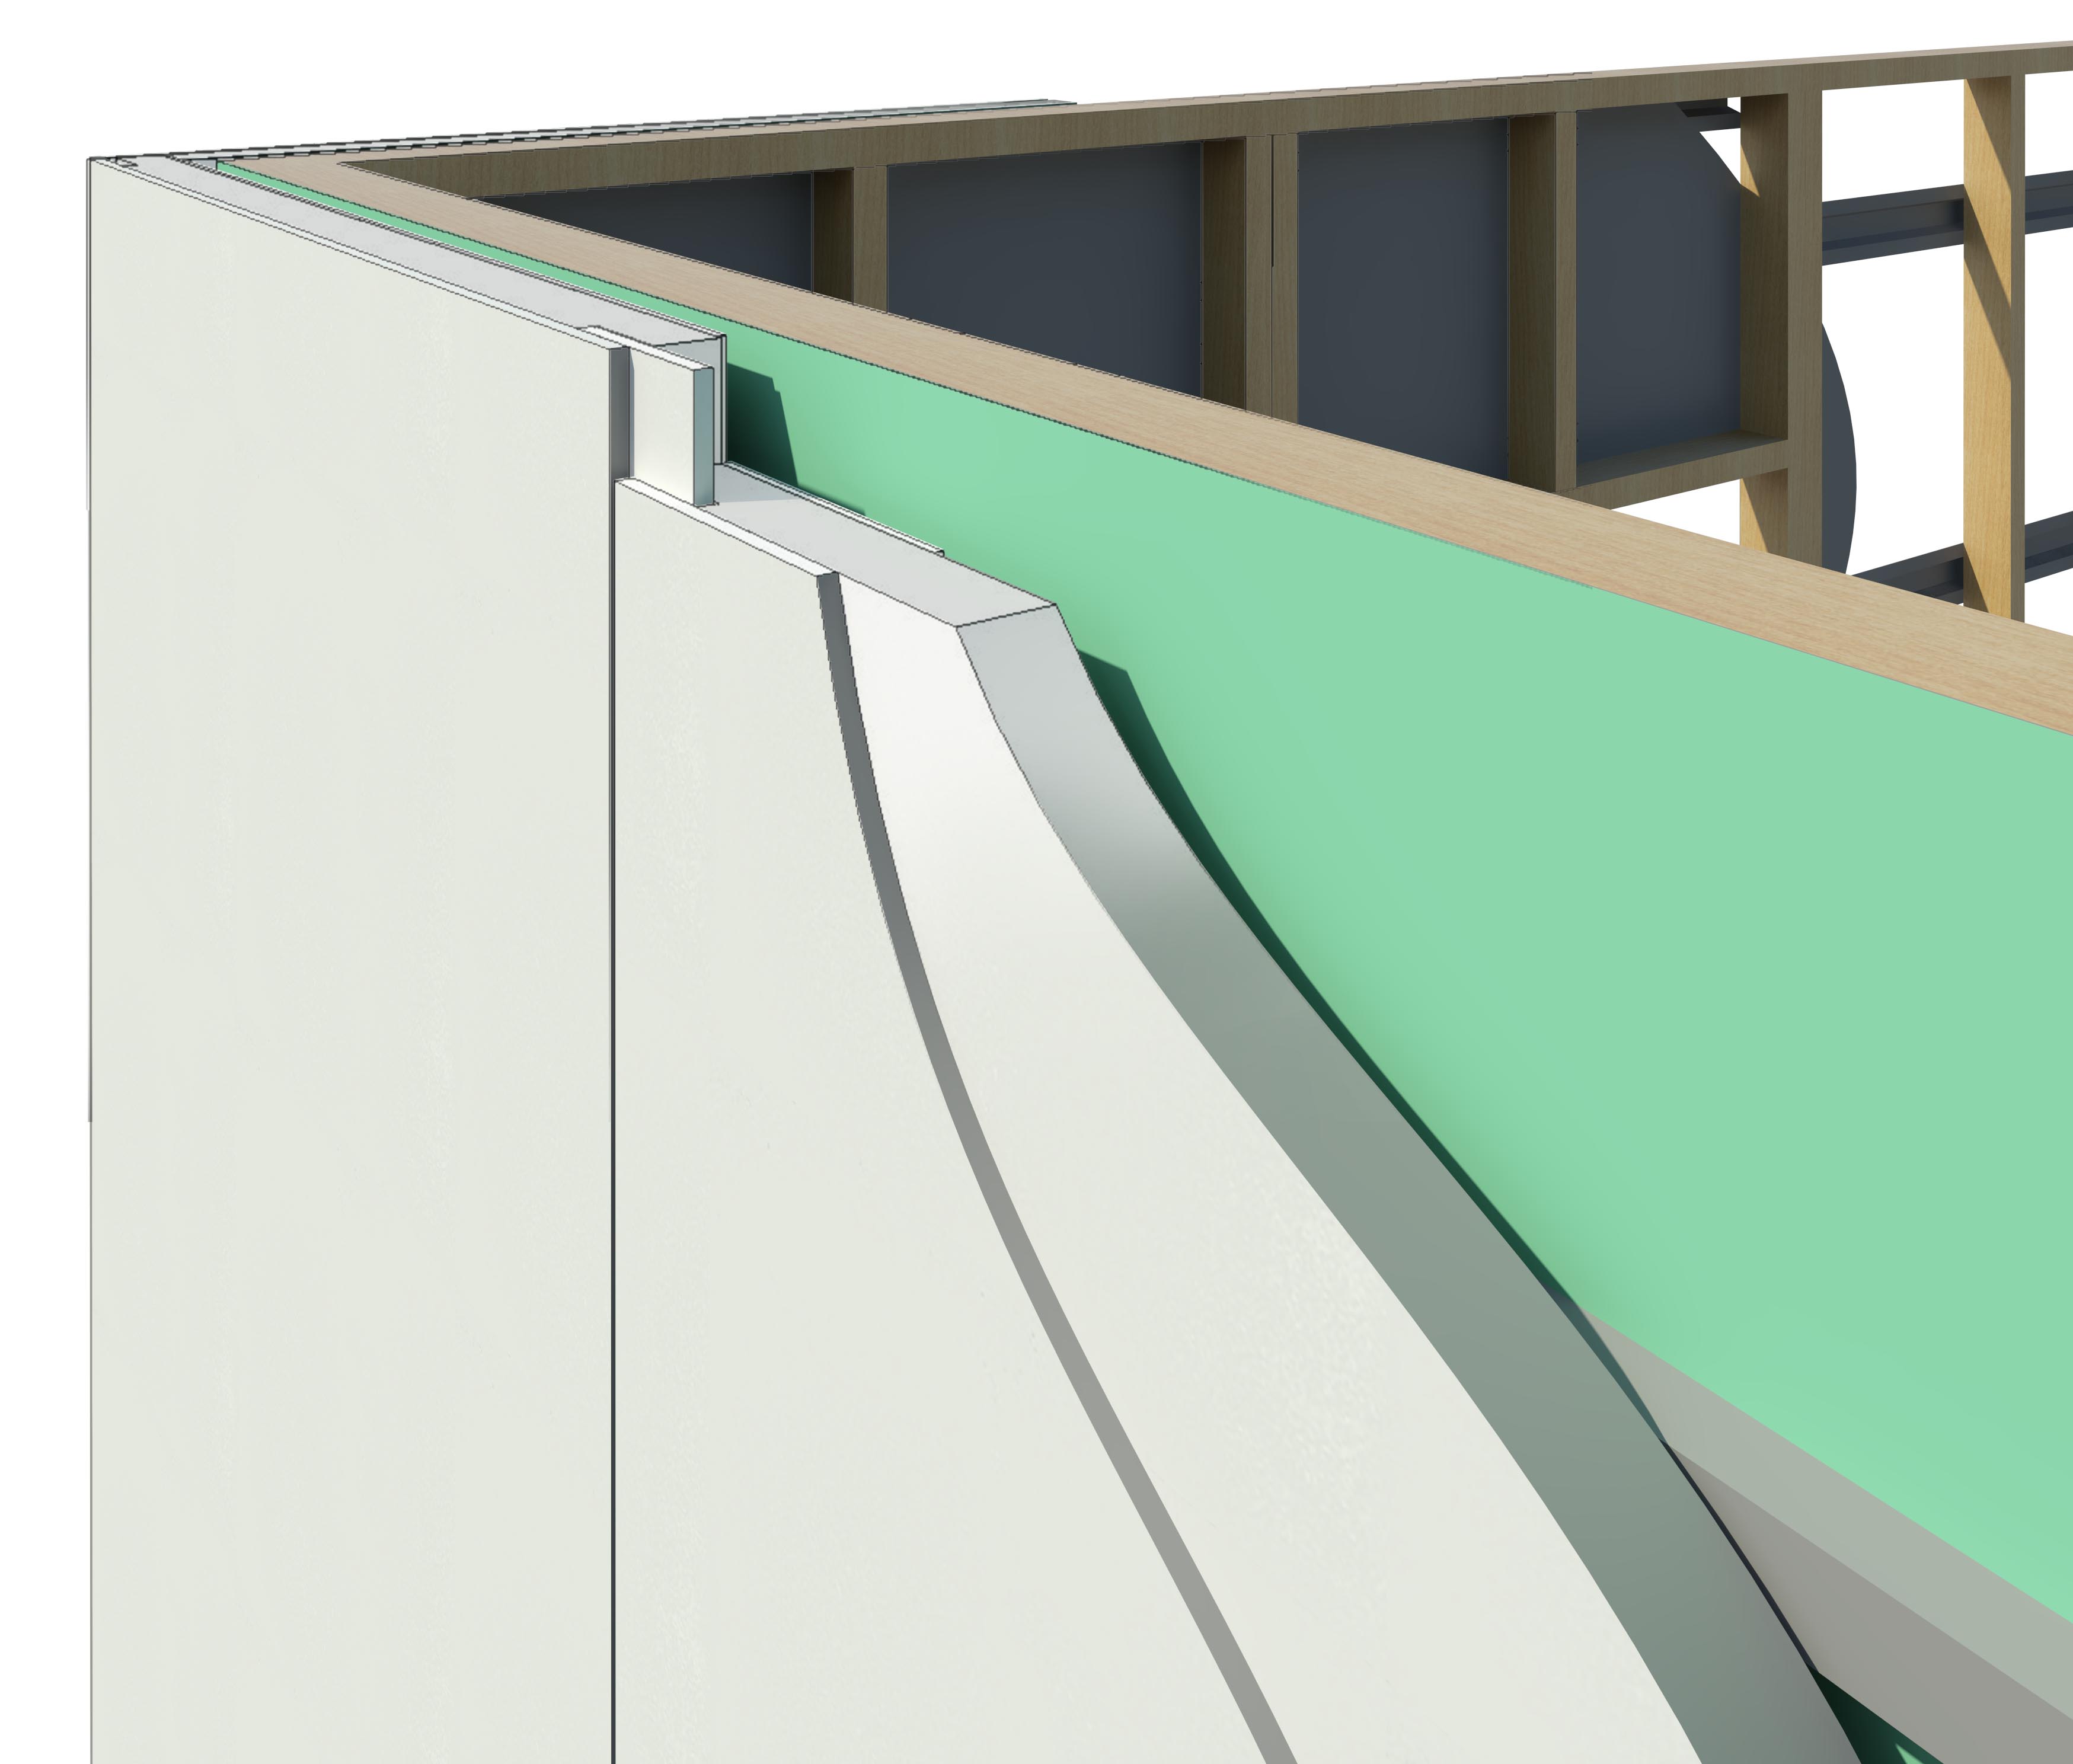

StructaClad Lite is an Exterior Insulation and Finishing System (EIFS) with a difference. SIP panels are gaining increased interest in the market due to their thermal advantages over existing products in the market. StructaClad Lite™ is a Thermal Panel that is a bridge between traditional framed housing and SIP construction. StructaClad Lite™ was designed specifically to provide improved thermally efficient housing to a traditional frame structure. Cracking of the render is often seen on the joints of AAC products. StructaClad Lite’s unique jointing system creates a homogeneous system that stops cracking. The external skin 10 mm MEGABOARD provides a hard surface finish that withstands impact due to the 34 MPa surface strength. MEGABOARD has passed ISO 7892:1988 Vertical Building Elements – Impact Resistant Tests – Impact bodies and general test procedures.
With many traditional insulation products, there is sag where the insulation degrades after time causing gaps in the wall insulation due to self-weight and the insulation loses its insulation value. With StructaClad Lite™ the insulation (Expanded Polystyrene) is bonded to create the panel providing insulation durability and stability.
StructaClad Lite has a 10mm external skin on the front laminated to an EPS core. The external skin is MEGABOARD manufactured using Sorel Cement rather than Portland Cement.
ReGen Building Solutions have a number of Installers who have used StructaClad Lite™ and will be able to assist with your project if required.
For information on how thermal resistance, thermal insulation and thermal mass work please go to this blog Thermal Resistance, Thermal mass and Thermal Insulation for residential housing
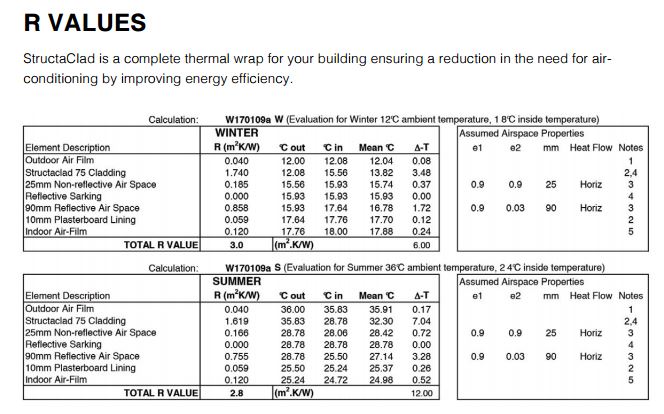
No Insulation in the wall cavity
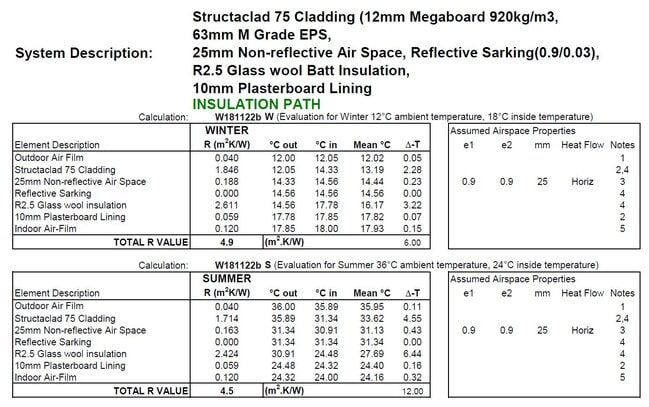
Insulation in the Wall Cavity
StructaClad Lite™ panels are manufactured in Australia and can be manufactured thicker to enhance the R values if required. With the inclusion of R2 Batts a house can achieve a R5 rating that is nearly impossible to achieve with normal construction processes.
StructaClad Lite™ FEATURES & BENEFITS
• Manufactured in Australia
• Lightweight construction materials
• 75mm thick insulated panels with high performance MEGABOARD skins
• Non-toxic: it does not contain any asbestos, organic solvents, formaldehyde, oils or other toxic substances
• Tested in Australia by approved NATA laboratories
• Excellent thermal resistance R2.4 (summer) – R2.6 (winter) This can be increased to TOTAL + R4.9 (summer) and R4.5 (winter) when insulation is added to the wall cavity.
• All third-party components have been tested with the product
• Can be built using standard carpentry tools
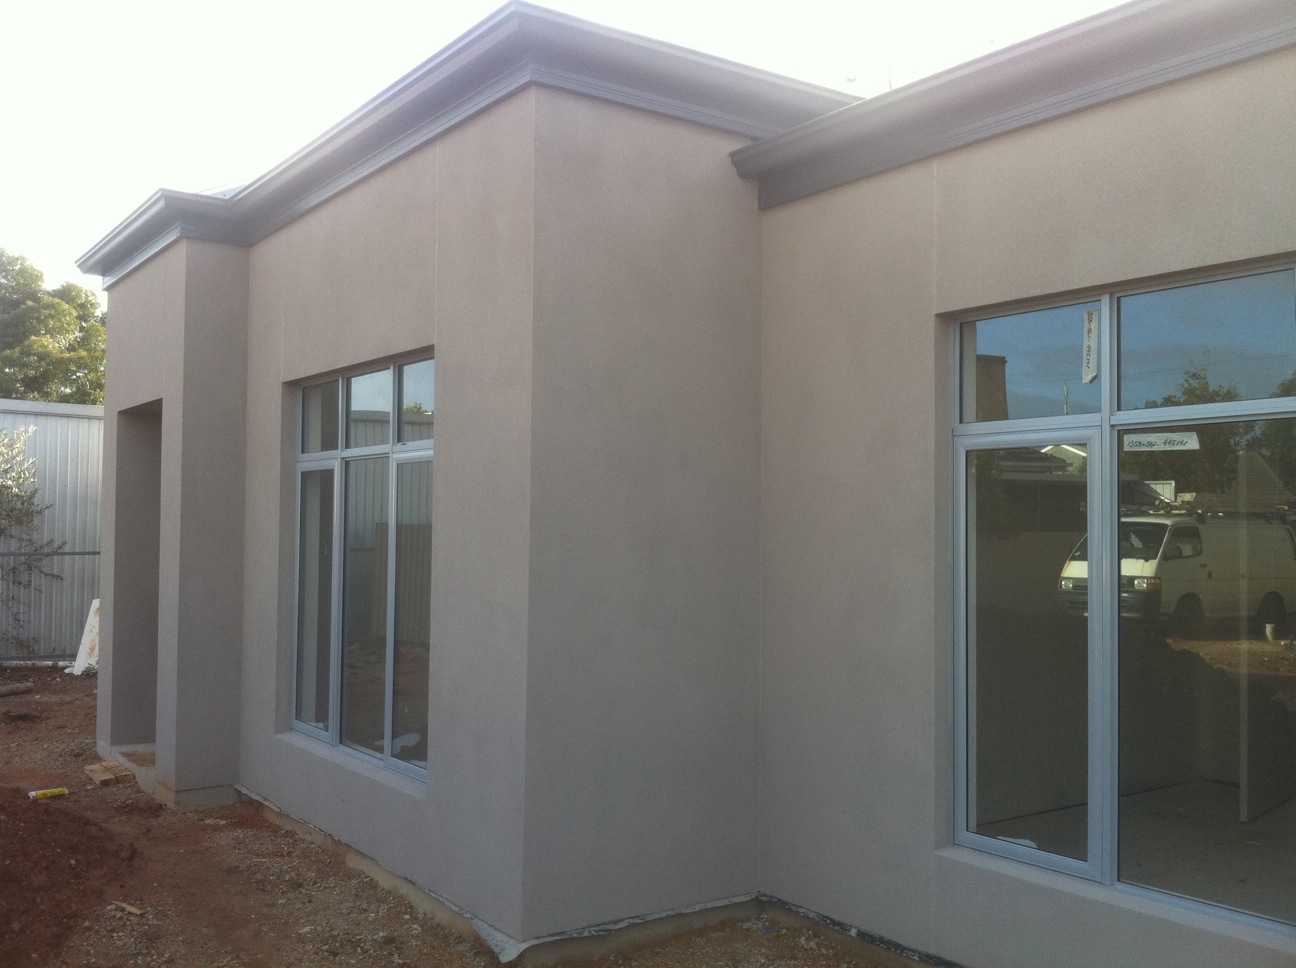
• Has been tested for render and texture coat finish or can be painted
• Excellent acoustic properties
• Has been approved for wind load classifications N1 – N5 and C1 – C3
• Waterproof tested
• All materials are recyclable
• Highly durable
• Impact resistant
• Eco friendly green building product
StructaClad
Preparation of framing
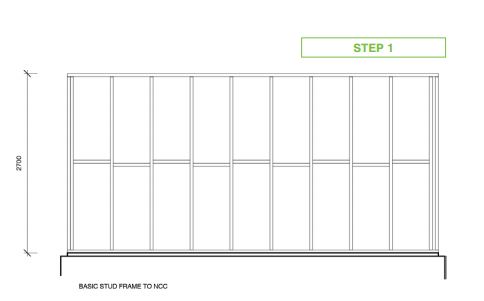
Framing Step 1
1. Check wall frame studs are both plumb and straight. And ensure they are either at 450mm or 600mm centres
2. Ensure all windows and doors are installed correctly
3. Ensure all materials are on site, including wall panels, battens, DPC, screws, adhesives, sealants
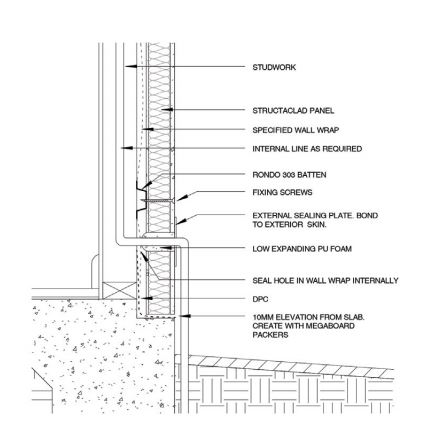
4. Ensure the concrete slab is straight and flat or ensure packers are used on the bottom of the panels to compensate for any slab rebate variance
5. Check that concrete slab rebate is clean of any debris or concrete slag. Apply the DPC along the rebate and secure up the face of the wall frame
Install Weather Barrier
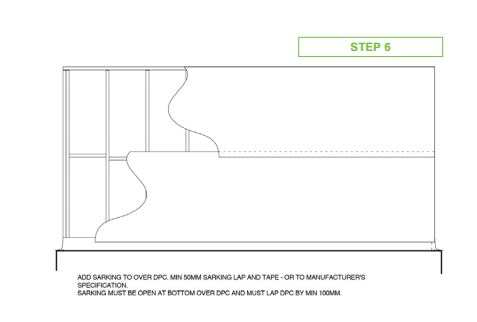
Installing weather barrier
6. Install the weather proof wrap on the frame. Apply horizontally, working from along the bottom and applying over the top of the DPC. Overlap the next horizontal layer until you reach the top of the wall frame
Rondo 303
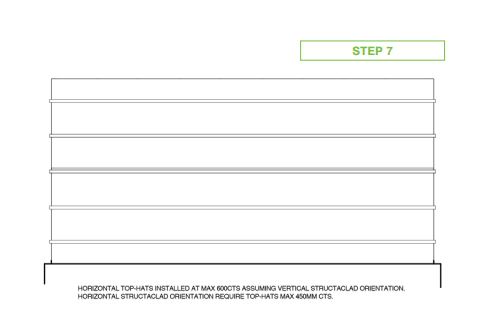
Installing Furring channels
Depending on the wall frame height, mark out on the weather proof wrap where the horizontal battens are to be placed, measuring a max of 150mm from the bottom up, and max of 150mm from the top down. The remaining battens to be spaced out equally to a max of 600mm centres for wind load classifications N1-C2. For wind load classification C3 the battens must be at a maximum of 300mm centres for at least 1200mm from every external corner. Battens are to be secured on each vertical stud using Rondo 303 batten fixing screws – 2/ 12g x 35mm hex head into the frame.
Refer to brochure for proper fixing method of furring channels
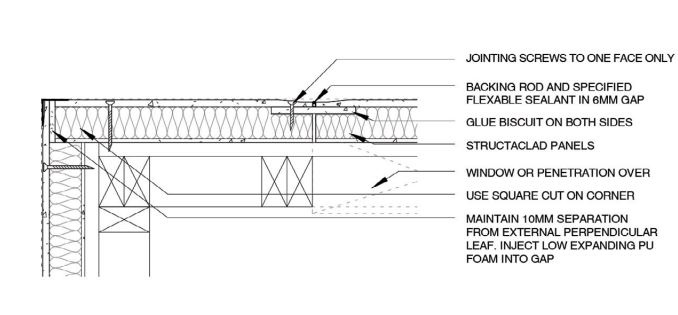
Corner details External
Corner details external 1

Corner detail external step 2

When you get to an external corner, measure and cut the panel using a straight edge and create the corner detail as shown
As the perpendicular corner panel is installed, there must be a 10mm gap between the rear face of the corner leaf, and the edge of the perpendicular panel to allow for PU foam injection, a backing rod and specified expansion sealant.
Corner Details Internal
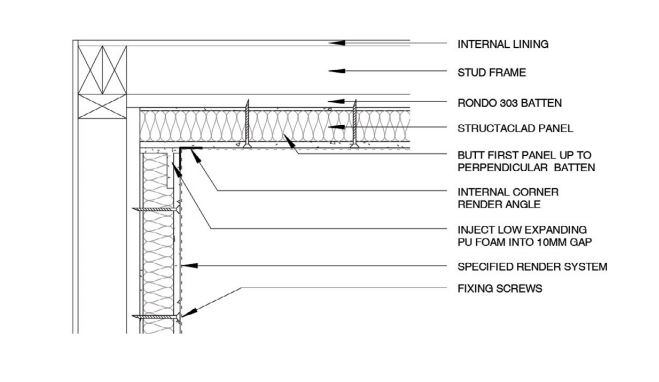
Corner details internal
When installing panels for an internal corner start by cutting the first panel to butt up against the perpendicular batten and fix as usual.
Install the next panel on the corner starting with a full panel. Ensure that a 10mm gap is observed from the exterior face of the first panel, and inject low expanding PU foam into the gap
Penetrations

Penetrations 1
Penetrations 2
Achieving penetrations through StructaClad panels is a simple process which requires a spade-bit of the appropriate size.
Wherever possible all penetrations should be drilled upwards from the outside to achieve a slope. This will hinder water ingress through the building skin.
Penetration holes will usually have to be slightly larger than the actual item passing through the panel. In the instance that the penetration is not a tight fit, low expanding PU foam will need to be injected into the hole surrounding the penetration and cut back flush with the panel face when it has cured. If the penetration is tight with the hole, the specified flexible sealant must be used to create a complete and tight seal between the penetration and the external MEGABOARD skin
Where external items must be mounted to StructaClad, it is critical to ensure that the screws into the external leaf are not over-tightened. The fixing should be screwed slowly until resistance is felt, and no further.
Control Joints
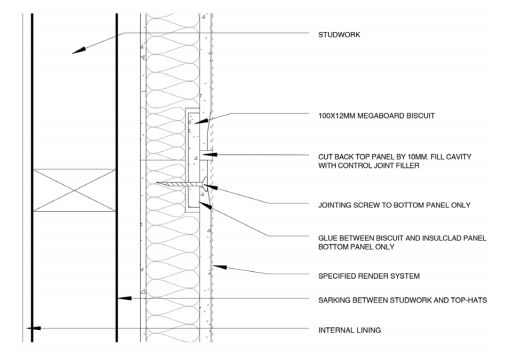
Horizontally stacked control joints
At all window and door openings provide a 10mm expansion gap between the panel and the frame. This gap is later to be filled with a 6mm piece of MEGABOARD and the approved flexible sealant prior to the texture coating process.
Control joints are to be located on either side of all window and door openings and are to be the entire height of the wall. Provide additional 10mm wide horizontal control joints above every vertically stacked panel where the two panels will abut each other. Provide vertical control joints at centres not exceeding 4.8m horizontally.
A control joint is created by inserting a fully glued joiner biscuit into the recess and screwing the biscuit to one panel only. The other half of the biscuit must be fully glued into the next panel without mechanical screw fixings. This applies to both vertical and horizontal joins. Horizontal control joints are to be screwed into the lower panel only. All joins to be filled with nominated PU flexible sealant.
Short Panels and Control Joints
Occasionally there will be control joints that must be installed at a location that does not suit the full width of a panel. In the instance of the control joint being too close to a corner, cut the panel to length and fix the panel to be 10mm away from the external leaf of the perpendicular panel. The 10mm gap must be filled with low expanding PU foam. By using the cut end against the corner, a control joint is more easily created where required.
Control joints for short panels are the same as standard and should be between 6-10mm wide. Glue must be applied to the biscuit rather than the recess. Biscuits for control joints are glued on both inserted sides on both faces of the biscuit, but screwed to one side only.
Creating a biscuit and recess in a panel.
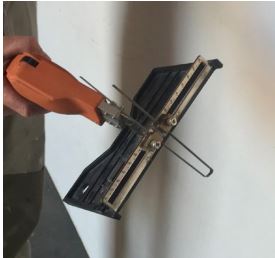
Foam Cutter
In the instance that a biscuit is needed on both edges of a short panel, a hot-knife / hot wire is to be used to recess the EPS. ReGen can supply a hot-knife as a sale or lease, or can provide information about where you can purchase the appropriate knife from.
Using the correct blade, ensure that the depth of the blade is between 76 and 80mm from the base plate.
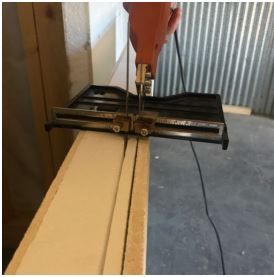
Cutting Foam for recess
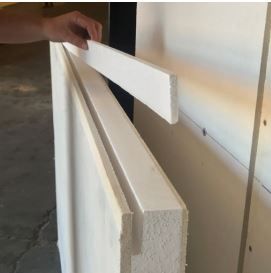
Removing foam from recess
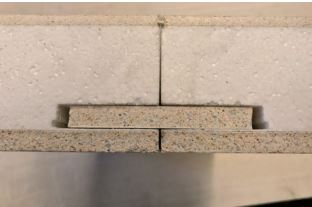
Biscuit joint
Holding the trigger to heat the blade firmly press the activated knife against the inside of the 12mm MEGABOARD leaf and immediately start to move it through the foam. The blade of the knife should be tight against the back of the external leaf at all times to ensure a straight cut.
The cut must be done in one smooth motion. Keeping the hot-knife in one place for more than one second will undesirably melt a pocket into the EPS.
Window Details
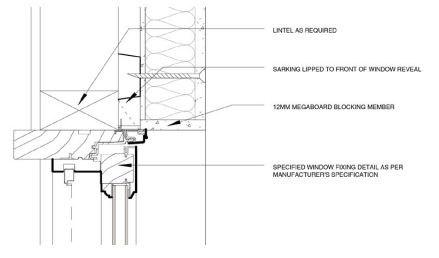
Window Details 1
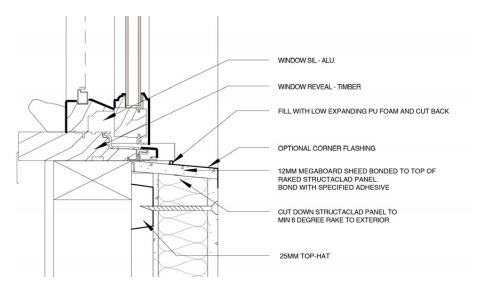
Window Details 2
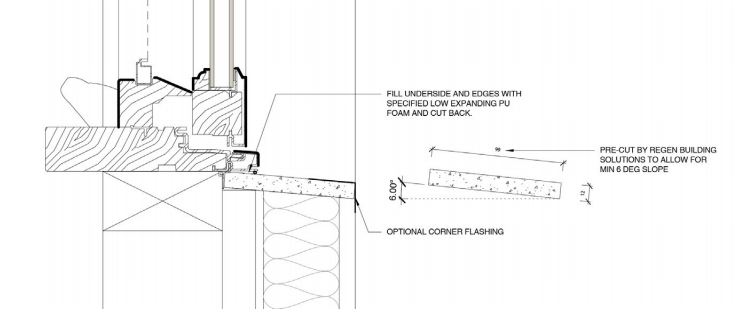
Window Details 3
Panels that are cut and installed above and below window openings are installed in the same manner as full sized panels.
The panel located under a window sill is to have a minimum 6-degree slope. A 12mm MEGABOARD strip is then glued and inserted in under the window sill, to ensure any water applied to the face of the window cannot get in and under the widow frame. Placing PU sealant with further protect this sill from any water ingress.
The installer is to ensure all window, door and control joints are correctly sealed.